

前言
google又一次成为大家膜拜的大神了。google大神在引导这机器学习的方向。 同时docker 也是一个非常好的工具,大大的方便了开发环境的构建,之前需要配置安装。 最近在自学机器学习,大热的Tensorflow自然不能错过,所以首先解决安装问题,为了不影响本地环境,所以本文基于Docker来安装Tensorflow,我的环境是Ubuntu16.04。

安装Docker
Docker分为CE和EE,这里我们选择CE,也就是常规的社区版,首先移除本机上可能存在的旧版本。
移除旧版本
$ sudo apt-get remove docker \
  docker-engine \
  docker.io
安装可选内核模块
从Ubuntu14.04以后,某些裁剪后的系统会把一部分内核模块移到可选内核包中,常以linux-image-extra-*开头,而Docker推荐的存储层驱动AUFS包含在可选内核模块包中,所以还是建议安装可选内核模块包的。可以使用以下命令安装:
$ sudo apt-get update
$ sudo apt-get install \
 linux-image-extra-$(uname -r) \
 linux-image-extra-virtual
证书及密钥准备
在正式安装之前,我们需要添加证书以及HTTPS传输的软件包以保证软件下载过程中不被篡改:
$ sudo apt-get update
$ sudo apt-get install \
 apt-transport-https \
 ca-certificates \
 curl \
 software-properties-common
添加软件源的GPG密钥:
$ curl -fsSL https://mirrors.ustc.edu.cn/docker-ce/linux/ubuntu/gpg | sudo apt-key add -
# 官方源
# $ curl -fsSL https://download.docker.com/linux/ubuntu/gpg | sudo apt-key add -
最后添加Docker软件源:
$ sudo add-apt-repository \
 "deb [arch=amd64] https://mirrors.ustc.edu.cn/docker-ce/linux/ubuntu \
 $(lsb_release -cs) \
 stable"
# 官方源
# $ sudo add-apt-repository \
# "deb [arch=amd64] https://download.docker.com/linux/ubuntu \
# $(lsb_release -cs) \
# stable"
安装Docker
$ sudo apt-get update
$ sudo apt-get install docker-ce
建立docker用户组
docker通常会使用Unix socket和Docker引擎通讯,通常只有root和docker用户组的用户才可以访问该socket,不然你就要一直sudo,所以最好把你当前需要使用docker的用户添加到docker用户组中。
建立docker用户组
$ sudo groupadd docker
将当前用户加入用户组
$ sudo usermod -aG docker $USER
最后重新登录下系统
测试Docker
确保服务启动
$ sudo service docker start
使用HelloWorld测试
测试安装是否成功
docker run hello-world
Unable to find image 'hello-world:latest' locally
latest: Pulling from library/hello-world
ca4f61b1923c: Pull complete
Digest: sha256:083de497cff944f969d8499ab94f07134c50bcf5e6b9559b27182d3fa80ce3f7
Status: Downloaded newer image for hello-world:latest

Hello from Docker!
This message shows that your installation appears to be working correctly.

To generate this message, Docker took the following steps:
 1. The Docker client contacted the Docker daemon.
 2. The Docker daemon pulled the "hello-world" image from the Docker Hub.
 (amd64)
 3. The Docker daemon created a new container from that image which runs the
 executable that produces the output you are currently reading.
 4. The Docker daemon streamed that output to the Docker client, which sent it
 to your terminal.

To try something more ambitious, you can run an Ubuntu container with:
 $ docker run -it ubuntu bash

Share images, automate workflows, and more with a free Docker ID:
 https://cloud.docker.com/

For more examples and ideas, visit:
 https://docs.docker.com/engine/userguide/
若能显示,证明安装成功。
安装Tensorflow
有了Docker,安装Tensorflow基本没有什么难度。
下载镜像
docker pull tensorflow/tensorflow

下载完毕后显示:
Status: Downloaded newer image for tensorflow/tensorflow:latest
创建Tensorflow容器
docker run --name my-tensorflow -it -p 8888:8888 -v ~/tensorflow:/test/data tensorflow/tensorflow
- --name:创建的容器名,即my-tensorflow
- -it:保留命令行运行
- p 8888:8888:将本地的8888端口和http://localhost:8888/映射
- -v ~/tensorflow:/test/data:将本地的~/tensorflow挂载到容器内的/test/data下
- tensorflow/tensorflow :默认是tensorflow/tensorflow:latest,指定使用的镜像
输入以上命令后,默认容器就被启动了,命令行显示:
[I 15:08:31.949 NotebookApp] Writing notebook server cookie secret to /root/.local/share/jupyter/runtime/notebook_cookie_secret
[W 15:08:31.970 NotebookApp] WARNING: The notebook server is listening on all IP addresses and not using encryption. This is not recommended.
[I 15:08:31.975 NotebookApp] Serving notebooks from local directory: /notebooks
[I 15:08:31.975 NotebookApp] 0 active kernels
[I 15:08:31.975 NotebookApp] The Jupyter Notebook is running at:
[I 15:08:31.975 NotebookApp] http://[all ip addresses on your system]:8888/?token=649d7cab1734e01db75b6c2b476ea87aa0b24dde56662a27
[I 15:08:31.975 NotebookApp] Use Control-C to stop this server and shut down all kernels (twice to skip confirmation).
[C 15:08:31.975 NotebookApp]

 Copy/paste this URL into your browser when you connect for the first time,
 to login with a token:
  ;
[I 15:09:08.581 NotebookApp] 302 GET /?token=649d7cab1734e01db75b6c2b476ea87aa0b24dde56662a27 (172.17.0.1) 0.42ms
拷贝带token的URL在浏览器打开
http://[all ip addresses on your system]:8888/?token=649d7cab1734e01db75b6c2b476ea87aa0b24dde56662a27
显示如下:

显示Jupyter Notebook,Jupyter Notebook(此前被称为 IPython notebook)是一个交互式笔记本。示例中已经显示了Tensorflow的入门教程,点开一个可以看见
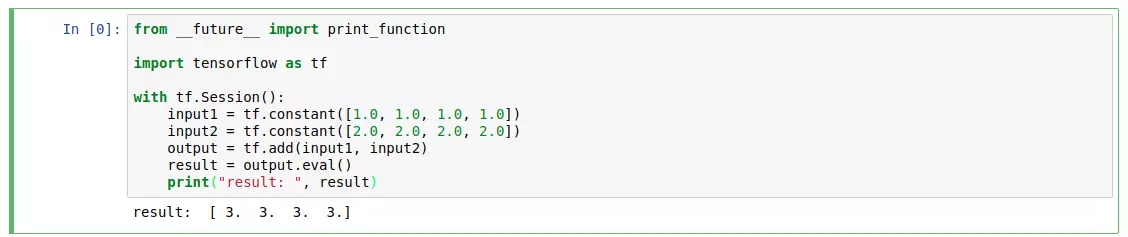
如上面这个例子,是使用tensorflow来使两个array相加,我们点击run,就可以看到运行的结果了。
关闭容器
docker stop my-tensortflow
再次打开
docker start my-tensortflow
如果不喜欢用Jupyter Notebook,我们也可以创建基于命令行的容器
基于命令行的容器
docker run -it --name bash_tensorflow tensorflow/tensorflow /bin/bash
这样我们就创建了名为bash_tensorflow的容器
还是用start命令启动容器:
docker start bash_tensorflow
再连接上容器:
docker attach bash_tensorflow
可以看到我们用终端连接上了容器,和操作Linux一样了。
这个镜像默认没有装vim,所以自己又下载了vim来写代码。
至此,安装过程结束。
总结
以上就是这篇文章的全部内容了,希望本文的内容对大家的学习或者工作具有一定的参考学习价值,如果有疑问大家可以留言交流,谢谢大家对的支持。