

一、web框架本质
1.基于socket,自己处理请求
#!/usr/bin/env python3
#coding:utf8
import socket
def handle_request(client):
 #接收请求
 buf = client.recv(1024)
 print(buf)
 #返回信息
 client.send(bytes('<h1>welcome liuyao webserver</h1>','utf8'))
def main():
 #创建sock对象
 sock = socket.socket()
 #监听80端口
 sock.bind(('localhost',8000))
 #最大连接数
 sock.listen(5)
 print('welcome nginx')
 #循环
 while True:
 #等待用户的连接,默认accept阻塞当有请求的时候往下执行
 connection,address = sock.accept()
 #把连接交给handle_request函数
 handle_request(connection)
 #关闭连接
 connection.close()
if __name__ == '__main__':
 main()
</div>
2.基于wsgi
WSGI,全称 Web Server Gateway Interface,或者 Python Web Server Gateway Interface ,是为 Python 语言定义的 Web 服务器和 Web 应用程序或框架之间的一种简单而通用的接口。自从 WSGI 被开发出来以后,许多其它语言中也出现了类似接口。
WSGI 的官方定义是,the Python Web Server Gateway Interface。从名字就可以看出来,这东西是一个Gateway,也就是网关。网关的作用就是在协议之间进行转换。
WSGI 是作为 Web 服务器与 Web 应用程序或应用框架之间的一种低级别的接口,以提升可移植 Web 应用开发的共同点。WSGI 是基于现存的 CGI 标准而设计的。
很多框架都自带了 WSGI server ,比如 Flask,webpy,Django、CherryPy等等。当然性能都不好,自带的 web server 更多的是测试用途,发布时则使用生产环境的 WSGI server或者是联合 nginx 做 uwsgi 。
python标准库提供的独立WSGI服务器称为wsgiref。
#!/usr/bin/env python
#coding:utf-8
#导入wsgi模块
from wsgiref.simple_server import make_server

def RunServer(environ, start_response):
 start_response('200 OK', [('Content-Type', 'text/html')])
 return [bytes("welcome webserver".encode('utf8'))]

if __name__ == '__main__':
 httpd = make_server('', 8000, RunServer)
 print ("Serving HTTP on port 8000...")
 httpd.serve_forever()
 #接收请求
 #预处理请求(封装了很多http请求的东西)
</div>
请求过来后就执行RunServer这个函数。
原理图:
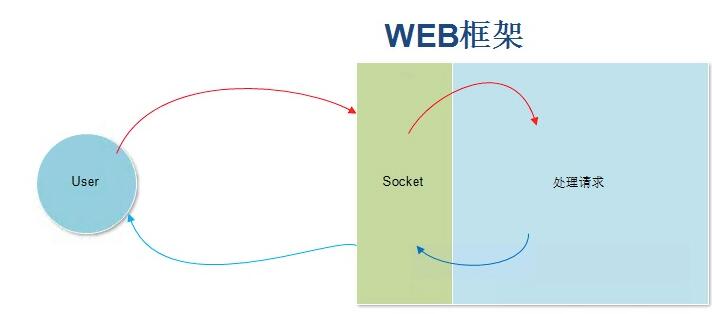
当用户发送请求,socket将请求交给函数处理,之后再返回给用户。
二、自定义web框架
python标准库提供的wsgiref模块开发一个自己的Web框架
之前的使用wsgiref只能访问一个url
下面这个可以根据你访问的不同url请求进行处理并且返回给用户
#!/usr/bin/env python
#coding:utf-8
from wsgiref.simple_server import make_server
def RunServer(environ, start_response):
 start_response('200 OK', [('Content-Type','text/html')])
 #根据url的不同,返回不同的字符串
 #1 获取URL[URL从哪里获取?当请求过来之后执行RunServer,
 #wsgi给咱们封装了这些请求,这些请求都封装到了,environ & start_response]
 request_url = environ['PATH_INFO']
 print (request_url)
 #2 根据URL做不同的相应
 #print environ #这里可以通过断点来查看它都封装了什么数据
 if request_url == '/login':
  return [bytes("welcome login",'utf8')]
 elif request_url == '/reg':
  return [bytes("welcome reg",'utf8')]
 else:
  return [bytes('<h1>404! no found</h1>','utf8')]

if __name__ == '__main__':
 httpd = make_server('', 8000, RunServer)
 print ("Serving HTTP on port 8000...")
 httpd.serve_forever()
</div>
当然 以上虽然根据不同url来进行处理,但是如果大量url的话,那么代码写起来就很繁琐。
所以使用下面方法进行处理
#!/usr/bin/env python
#coding:utf-8
from wsgiref.simple_server import make_server
def index():
 return [bytes('<h1>index</h1>','utf8')]
def login():
 return [bytes('<h1>login</h1>','utf8')]
def reg():
 return [bytes('<h1>reg</h1>','utf8')]
def layout():
 return [bytes('<h1>layout</h1>','utf8')]
#定义一个列表 把url和上面的函数做一个对应
urllist = [
 ('/index',index),
 ('/login',login),
 ('/reg',reg),
 ('/layout',layout),
]
def RunServer(environ, start_response):
 start_response('200 OK', [('Content-Type','text/html')])
 #根据url的不同,返回不同的字符串
 #1 获取URL[URL从哪里获取?当请求过来之后执行RunServer,wsgi给咱们封装了这些请求,这些请求都封装到了,environ & start_response]
 request_url = environ['PATH_INFO']
 print (request_url)
 #2 根据URL做不同的相应
 #print environ #这里可以通过断点来查看它都封装了什么数据
 #循环这个列表 找到你打开的url 返回url对应的函数
 for url in urllist:
  if request_url == url[0]:
   return url[1]()
 else:
  #url_list列表里都没有返回404
  return [bytes('<h1>404 not found</h1>','utf8')]
if __name__ == '__main__':
 httpd = make_server('', 8000, RunServer)
 print ("Serving HTTP on port 8000...")
 httpd.serve_forever()
</div>
三、模板引擎
对应上面的操作 都是根据用户访问的url返回给用户一个字符串的 比如return xxx
案例:
首先写一个index.html页面
内容:
<!DOCTYPE html>
<html lang="en">
<head>
<meta charset="UTF-8">
<title>index</title>
</head>
<body>
<h1>welcome index</h1>
</body>
</html>
</div>
login.html页面
内容:
<!DOCTYPE html>
<html lang="en">
<head>
 <meta charset="UTF-8">
 <title>login</title>
</head>
<body>
 <h1>welcome login</h1>
 <form>
  user:<input type="text"/>
  pass:<input type="password"/>
  <button type="button">login in</button>
 </form>
</body>
</html>
</div>
python代码:
#!/usr/bin/env python
#coding:utf-8
from wsgiref.simple_server import make_server
def index():
 #把index页面读进来返回给用户
 indexfile = open('index.html','r+').read()
 return [bytes(indexfile,'utf8')]
def login():
 loginfile = open('login.html','r+').read()
 return [bytes(loginfile,'utf8')]
urllist = [
 ('/login',login),
 ('/index',index),
]
def RunServer(environ, start_response):
 start_response('200 OK', [('Content-Type','text/html')])
 #根据url的不同,返回不同的字符串
 #1 获取URL[URL从哪里获取?当请求过来之后执行RunServer,wsgi给咱们封装了这些请求,这些请求都封装到了,environ & start_response]
 request_url = environ['PATH_INFO']
 print (request_url)
 #2 根据URL做不同的相应
 #print environ #这里可以通过断点来查看它都封装了什么数据
 for url in urllist:
  #如果用户请求的url和咱们定义的rul匹配
  if request_url == url[0]:
   #执行
   return url[1]()
 else:
  #url_list列表里都没有返回404
  return [bytes('<h1>404 not found</h1>','utf8')]
if __name__ == '__main__':
 httpd = make_server('', 8000, RunServer)
 print ("Serving HTTP on port 8000...")
 httpd.serve_forever()
</div>
但是以上内容只能返回给静态内容,不能返回动态内容
那么如何返回动态内容呢
自定义一套特殊的语法,进行替换
使用开源工具jinja2,遵循其指定语法
index.html 遵循jinja语法进行替换、循环、判断
先展示大概效果,具体jinja2会在下章django笔记来进行详细说明
index.html页面
内容:
<!DOCTYPE html>
<html lang="en">
<head>
<meta charset="UTF-8">
<title>Title</title>
</head>
<body>
<!--general replace-->
<h1>{{ name }}</h1>
<h1>{{ age }}</h1>
<h1>{{ time }}</h1>
<!--for circular replace-->
<ul>
{% for item in user_list %}
<li&g