

本文实例为大家解析了Python多线程,供大家参考,具体内容如下
1、多线程的理解
多进程和多线程都可以执行多个任务,线程是进程的一部分。线程的特点是线程之间可以共享内存和变量,资源消耗少(不过在Unix环境中,多进程和多线程资源调度消耗差距不明显,Unix调度较快),缺点是线程之间的同步和加锁比较麻烦。
2、Python多线程创建
在Python中,同样可以实现多线程,有两个标准模块thread和threading,不过我们主要使用更高级的threading模块。使用例子:
import threading
import time

def target():
 print 'the curent threading %s is running' % threading.current_thread().name
 time.sleep(1)
 print 'the curent threading %s is ended' % threading.current_thread().name

print 'the curent threading %s is running' % threading.current_thread().name
t = threading.Thread(target=target)

t.start()
t.join()
print 'the curent threading %s is ended' % threading.current_thread().name
</div>
输出:
the curent threading MainThread is running
the curent threading Thread-1 is running
the curent threading Thread-1 is ended
the curent threading MainThread is ended
</div>
start是启动线程,join是阻塞当前线程,即使得在当前线程结束时,不会退出。从结果可以看到,主线程直到Thread-1结束之后才结束。
Python中,默认情况下,如果不加join语句,那么主线程不会等到当前线程结束才结束,但却不会立即杀死该线程。如不加join输出如下:
the curent threading MainThread is running
the curent threading Thread-1 is running
 the curent threading MainThread is ended
the curent threading Thread-1 is ended
</div>
但如果为线程实例添加t.setDaemon(True)之后,如果不加join语句,那么当主线程结束之后,会杀死子线程。代码:
import threading
import time
def target():
 print 'the curent threading %s is running' % threading.current_thread().name
 time.sleep(4)
 print 'the curent threading %s is ended' % threading.current_thread().name
print 'the curent threading %s is running' % threading.current_thread().name
t = threading.Thread(target=target)
t.setDaemon(True)
t.start()
t.join()
print 'the curent threading %s is ended' % threading.current_thread().name
</div>
输出如下:
the curent threading MainThread is running
the curent threading Thread-1 is runningthe curent threading MainThread is ended
</div>
如果加上join,并设置等待时间,就会等待线程一段时间再退出:
import threading
import time
def target():
 print 'the curent threading %s is running' % threading.current_thread().name
 time.sleep(4)
 print 'the curent threading %s is ended' % threading.current_thread().name
print 'the curent threading %s is running' % threading.current_thread().name
t = threading.Thread(target=target)
t.setDaemon(True)
t.start()
t.join(1)
</div>
输出:
the curent threading MainThread is running
the curent threading Thread-1 is running
the curent threading MainThread is ended
</div>
主线程等待1秒,就自动结束,并杀死子线程。如果join不加等待时间,t.join(),就会一直等待,一直到子线程结束,输出如下:
the curent threading MainThread is running
the curent threading Thread-1 is running
the curent threading Thread-1 is ended
the curent threading MainThread is ended
</div>
3、线程锁和ThreadLocal
(1)线程锁
对于多线程来说,最大的特点就是线程之间可以共享数据,那么共享数据就会出现多线程同时更改一个变量,使用同样的资源,而出现死锁、数据错乱等情况。
假设有两个全局资源,a和b,有两个线程thread1,thread2. thread1占用a,想访问b,但此时thread2占用b,想访问a,两个线程都不释放此时拥有的资源,那么就会造成死锁。
对于该问题,出现了Lock。 当访问某个资源之前,用Lock.acquire()锁住资源,访问之后,用Lock.release()释放资源。
a = 3
lock = threading.Lock()
def target():
 print 'the curent threading %s is running' % threading.current_thread().name
 time.sleep(4)
 global a
 lock.acquire()
 try:
 a += 3
 finally:
 lock.release()
 print 'the curent threading %s is ended' % threading.current_thread().name
 print 'yes'
</div>
用finally的目的是防止当前线程无线占用资源。
(2)ThreadLocal
介绍完线程锁,接下来出场的是ThreadLocal。当不想将变量共享给其他线程时,可以使用局部变量,但在函数中定义局部变量会使得在函数之间传递特别麻烦。ThreadLocal是非常牛逼的东西,它解决了全局变量需要枷锁,局部变量传递麻烦的两个问题。通过在线程中定义:
local_school = threading.local()
此时这个local_school就变成了一个全局变量,但这个全局变量只在该线程中为全局变量,对于其他线程来说是局部变量,别的线程不可更改。 def process_thread(name):# 绑定ThreadLocal的student: local_school.student = name
这个student属性只有本线程可以修改,别的线程不可以。代码:
local = threading.local()
def func(name):
 print 'current thread:%s' % threading.currentThread().name
 local.name = name
 print "%s in %s" % (local.name,threading.currentThread().name)
t1 = threading.Thread(target=func,args=('haibo',))
t2 = threading.Thread(target=func,args=('lina',))
t1.start()
t2.start()
t1.join()
t2.join()
</div>
从代码中也可以看到,可以将ThreadLocal理解成一个dict,可以绑定不同变量。
ThreadLocal用的最多的地方就是每一个线程处理一个HTTP请求,在Flask框架中利用的就是该原理,它使用的是基于Werkzeug的LocalStack。
4、Map实现多线程
对于多线程的使用,我们经常是用thread来创建,比较繁琐:
class MyThread(threading.Thread):
 def init(self):
 threading.Thread.init(self)
def run(self):
 lock.acquire()
 print threading.currentThread().getName()
 lock.release()

def build_worker(num):
 workers = []
 for t in range(num):
 work = MyThread()
 work.start()
 workers.append(work)
 return workers
def producer():
 threads = build_worker(4)
 for w in threads:
 w.join()
 print 'Done'
</div>
如果要创建更多的线程,那就要一一加到里面,操作麻烦,代码可读性也变差。在Python中,可以使用map函数简化代码。map可以实现多任务的并发,简单示例:
results=map(urllib2.urlopen,urls)</div>
map将urls的每个元素当做参数分别传给urllib2.urlopen函数,并最后把结果放到results列表中,map 函数一手包办了序列操作、参数传递和结果保存等一系列的操作。 其原理:
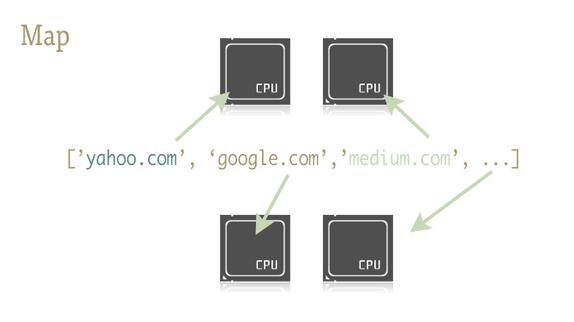
map函数负责将线程分给不同的CPU。
在 Python 中有个两个库包含了 map 函数: multiprocessing 和它鲜为人知的子库 multiprocessing.dummy.dummy 是 multiprocessing 模块的完整克隆,唯一的不同在于 multiprocessing 作用于进程,而 dummy 模块作用于线程。代码:
import urllib2

from multiprocessing.dummy import Pool as ThreadPool

urls = ['http://www.baidu.com','http://www.sina.com','http://www.qq.com']

pool = ThreadPool()

results = pool.map(urllib2.urlopen,urls)
print results
pool.close()
pool.join()

print 'main ended'
</div>
pool = ThreadPool()创建了线程